Table of Contents
In the world of electronics, a bench power supply is an indispensable tool for hobbyists, engineers, and technicians. Whether you're testing a new circuit, repairing a device, charging a battery, or experimenting with electronic components, a reliable power supply is a must-have. While the market offers a wide array of commercial bench power supplies, there are compelling reasons to consider building your own DIY bench power supply.
Building a DIY bench power supply involves understanding the key components and their functions, which is crucial for monitoring current flow. After gathering the necessary components, assembly preparation begins by removing the protective film from one side of the plexiglass sheet and marking where holes will be drilled for mounting components. Proper mounting of components on the plexiglass sheet is essential to prevent accidental disconnections or shorts during operation.
The wiring phase involves identifying the positive (+) and negative (-) terminals of the 24V DC power supply, which will power both the buck and boost converters. Wires are connected from the power supply to the input terminals of the buck and boost converters, and the output terminals of each converter provide regulated voltage for the respective loads or circuits. Both converters receive power from the same source and independently regulate voltage to desired levels, ensuring a versatile and functional bench power supply.
In this article, we'll explore the benefits of creating a custom power supply, the principles of constant current charging, and the key components required for the project. We'll also provide a step-by-step guide on how to assemble and wire your very own DIY bench power supply.
Why Build A DIY Power Supply?
Why would you want to build a bench power supply when you could just buy one? Well, the ones that you can buy may not be good enough. They may not support the amount of current or voltage range that you need. They may also be too expensive. Another thing to consider is that when you learn how to build your own bench power supply, you learn how to build a battery charger.
When building a bench power supply, you need to have a constant current. This may be a little confusing, as constant current sounds like it means the current will be non-adjustable. Constant current means that the current is adjustable to a constant setting. This setting will remain until the end of the charge cycle when it finally gives in to Ohm's Law.
For example, when charging a 20s 72-volt battery at 84 volts with a current of 5 amps, the actual voltage of the battery might be 84.5 volts. Since there isn't enough difference between the two voltages to transfer 5 amps, it slowly tapers off. This is done to prevent battery overcharging or currenting.
In order to prevent overcharging or over-current to the cell, you can set the charge voltage to something higher than what the cell can support and then monitor the charge voltage. However, this requires external circuitry and software, which makes it more complicated. For this reason, most battery chargers use the constant current constant voltage method instead.
Components Required To Make A DIY Bench Power Supply
Acrylic Sheet
This acrylic sheet is pretty nice. It comes in various sizes such as 12 x 12 x 1 8, 12 x 24 x 1 8, 6 x 12 x 1 8 in a 2 pack, 12 x 12 x 1 8 in a 2 pack, and 12 x 12 x 1 8 in a 4 pack. It can be used for all kinds of things and can be cut with a laser, a table saw, a jigsaw, a drill, a router, a bandsaw, or several other commonly available tools.
It's strong and easy to cut and easy to work with and it looks good. The 12 x 12 x 1 8 piece weighs 14.39 ounces so just consider that in your project. It has a protective paper film that's on both sides and is easy to peel off.
 Acrylic Sheet
Black sheet gives the project an awesome clean look!
Check Price
Power Supply
This 24-volt 600-watt DC power supply can supply up to 25 amps to a load before it experiences any significant voltage drop or overheating. It's only 40 bucks which is a really good deal considering chargers that can push that amount of power are much more expensive than that. Granted this is not a charger yet, it still needs a regulator or two to be able to control the voltage and current to make it a proper battery charger, but this is the core of the battery charger as it is the input power supply.
Even though this is a fixed-mode power supply and it's not listed on the page, there is an adjustment screw on the inside. Because it is not an adjustable power supply it won't go down to zero, but you'll have a 23 to 26-volt range or so that you can adjust there. It has large screw terminals and multiple screw terminals for the positives and negatives. So if you notice it's got three screw terminals for each one.
So if you're pulling the full current from that power supply you want to use all of those connections because even if you have very large wires the connection to the board that that screw terminal uses might not be as robust as you think which is why there's three of them for each leg. It's got one of those switches on the side that allows you to use it with either 110-volt or 220-volt systems. It's 85-plus percent efficient and has a very small half-a-milliamp leakage current.
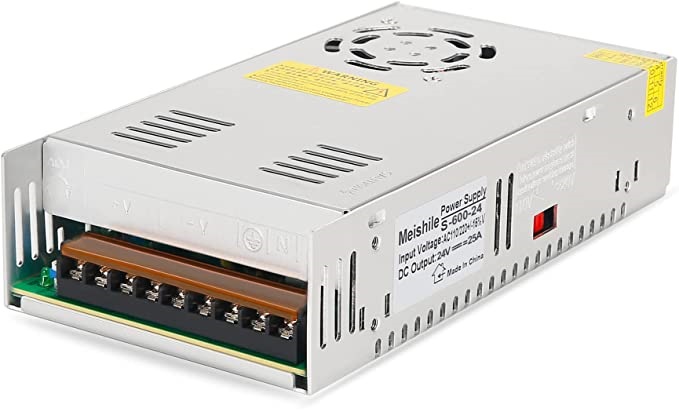 600W DC Power Supply
Input voltage: AC 110V/220V, Output 24V, Rated power 25A 600W
Check Price
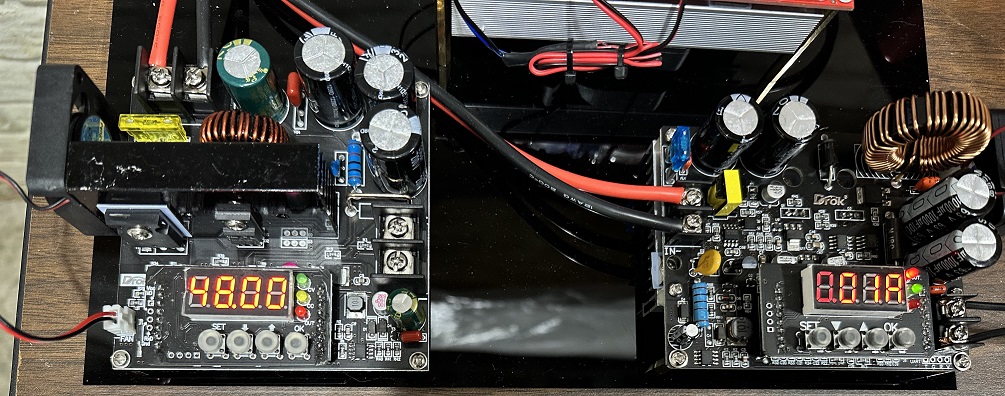
Constant Current Buck Converter
A constant current buck converter is where all the magic happens when it comes to building an adjustable bench power supply. If you have just a constant voltage buck converter all you can do is adjust the voltage. That’s good enough to power all kinds of cool and interesting and awesome loads, but it's not good enough for battery charging.
For battery charging you have to be able to set both the voltage and the current. With a good constant current buck converter, you'll be able to do that easily. This one has buttons on it so you can literally just key in the voltage and current that you want.
Now, how a constant current buck converter works is by adjusting the voltage to maintain a particular current. So if you set the voltage you're really only setting the maximum voltage. So on a constant current buck converter if you set it to 16.8 volts and 2 amps those are the maximum figures. If it's running at 16.8 volts it won't be running at 2 amps because that means the battery has been charged.
It will only run at 2 amps while it's pulling it up to 16.8 volts. And it does so by adjusting the voltage in real time to maintain the current. When in a constant voltage power supply it does its magic on the inside to maintain an output voltage. It does things internally to make sure that the voltage externally always stays the same. For a constant current power supply, it will change the voltage to keep the current the same. This is required for charging batteries.
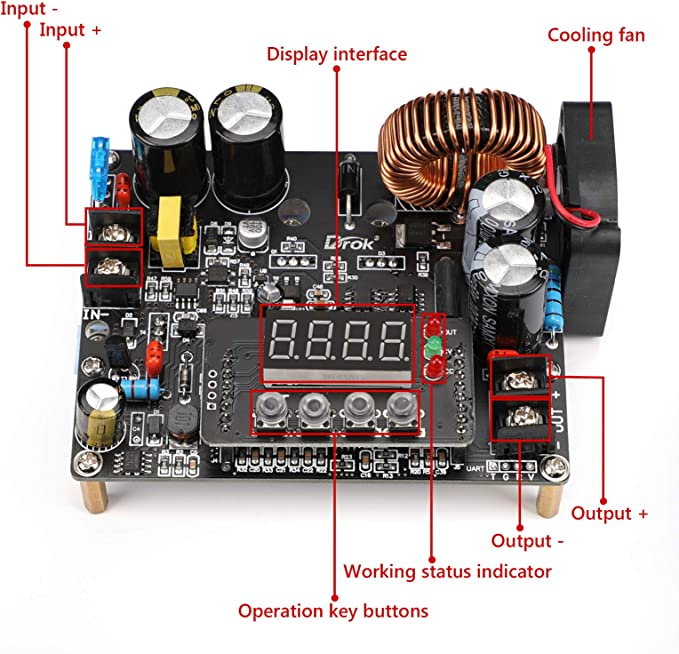 CC/CV Buck Converter
Input voltage range is DC 10-65V; Output voltage range is DC 0-60V, Output current range is 0-12A, Max output power is 720W. Really Easy to adjust output voltage and amperage.
Check Price
Constant Current Boost Converter
A constant current boost converter is an indispensable component in the design of a versatile bench power supply, especially when it comes to applications that require precise current control, such as battery charging. While a constant voltage boost converter allows you to adjust the output voltage, it lacks the ability to regulate the output current. This is where a constant current boost converter comes into play.
For instance, consider a scenario where you need to charge a 48V battery using a 24V power supply. In this case, a constant current boost converter is the ideal solution, as it can step up the input voltage from 24V to the required 48V while maintaining a constant current throughout the charging process.
Battery charging requires the ability to set and control both the output voltage and the output current. A well-designed constant current boost converter provides this functionality with ease. Some models come equipped with user-friendly interfaces, allowing you to directly input the desired voltage and current values.
The operating principle of a constant current boost converter involves regulating the output voltage to achieve a specific current level. When you set the output voltage, you are essentially defining the maximum allowable voltage. For example, if you configure a constant current boost converter to deliver 48 volts and 2 amps to charge the 48V battery, these values represent the upper limits. The converter will dynamically adjust the output voltage in real-time to maintain the desired current level of 2 amps.
As the battery charges and its voltage approaches the 48V threshold, the boost converter reduces the charging current to prevent overcharging. Unlike a constant voltage power supply, which employs internal mechanisms to stabilize the output voltage, a constant current power supply actively varies the output voltage to keep the current constant. This level of control is crucial for safely and efficiently charging batteries, especially when the input voltage is lower than the battery voltage.
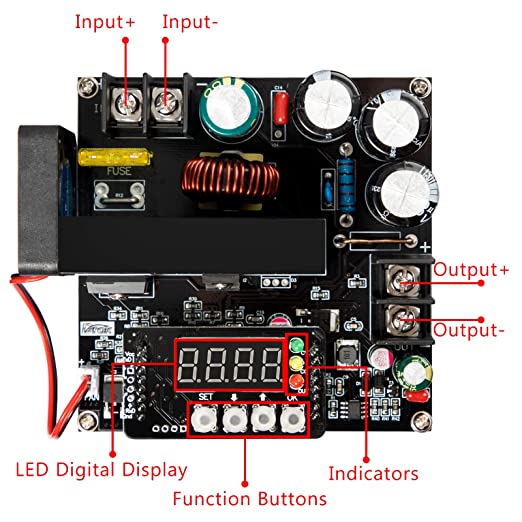 CC/CV Boost Converter
Input voltage: DC 8-60V; Output voltage: DC 10-120V; Input current: 0-15A; Output current: 0-15A. Max power 900W.
Check Price
How To Make A DIY Bench Power Supply
When building a power supply system, it's important to understand the components and how they work. If you're planning to use a high-power boost converter, you'll need a large shunt-based current meter to handle the increased current levels.
Setting Up The Acrylic Sheet
Start by removing the protective film from one side of the plexiglass sheet, the side that you leave the paper on will be the bottom. Use the side with the paper remaining to mark your holes. Place the various boards and converters where you want them, and use a marker to indicate where you'll drill holes for mounting the components.
Mounting Components and Preparing for Wiring
Before proceeding with wiring, mount all components onto the plexiglass sheet. Use the marked locations as a guide for drilling holes and fastening the components in place. Proper mounting is required to make sure there are no accidental disconnections or shorts during operation. With the components mounted, you're ready to move on to the wiring phase. It's important to plan the wiring layout in advance to ensure a neat and organized setup.
Wiring It All Together
- Power Supply Connections:
- Identify the positive (+) and negative (-) terminals of the 24V DC power supply. These terminals will serve as the source of power for both the buck and boost converters.
- Buck Converter Connections:
- Connect a wire from the positive (+) terminal of the 24V DC power supply to the positive input terminal of the buck converter.
- Connect a wire from the negative (-) terminal of the 24V DC power supply to the negative input terminal of the buck converter.
- The output terminals of the buck converter will provide the regulated lower voltage. You can connect the positive and negative output terminals to the respective loads or circuits that require the lower voltage.
- Boost Converter Connections:
- Connect a wire from the positive (+) terminal of the 24V DC power supply to the positive input terminal of the boost converter. This connection should be made in parallel to the connection made to the buck converter, meaning that both converters are connected to the same positive terminal of the power supply.
- Connect a wire from the negative (-) terminal of the 24V DC power supply to the negative input terminal of the boost converter. This connection should be made in parallel to the connection made to the buck converter, meaning that both converters are connected to the same negative terminal of the power supply.
- The output terminals of the boost converter will provide the regulated higher voltage. You can connect the positive and negative output terminals to the respective loads or circuits that require the higher voltage.
Each converter will receive power from the same power supply and will independently regulate the voltage to the desired levels for their respective loads.
Time To Test Your DIY Bench Power Supply
Now for the fun part! Hook a multimeter up to the output on the buck converter, make an adjustment, and ensure that the voltage is accurate. Do the same thing for the boost converter. It’s super important to make sure your voltages are spot on if you plan on doing any battery charging.
If, on the other hand, you just want to use your DIY bench power supply to power various electronics, then it does not have to be super accurate, but it's still good to check.
Conclusion
A bench power supply is an invaluable asset in the field of electronics, serving as a versatile tool for a wide range of applications, from circuit testing to device repair. While commercial options are available, the process of building a DIY bench power supply offers unique advantages, including customization, cost-effectiveness, and the opportunity to gain hands-on experience.
By understanding the roles of key components, such as the AC to DC converter, the boost converter, and the buck converter, and by following a systematic approach to assembly and wiring, you can create a great DIY bench power supply. Remember, the goal of a bench power supply is the ability to control both voltage and current. Ideally, a nice bench power supply would have two independent outputs.
The DIY bench power supply in this guide is powered by a 24V DC source that incorporates both buck and boost converters, each of which independently regulates voltage and current output for different loads, circuits, or batteries. Making a DIY bench power supply is super rewarding and enhances your understanding of electronics while providing a practical tool for future projects.
We hope this article helped you make a great DIY bench power supply, thanks for reading!
Turn the guide into a real build plan
If this article is part of an actual battery, powerwall, or pack-design project, the next step is usually moving from theory into the calculators and planning tools.
Battery Storage
If this article sent you down a deeper rabbit hole, the topic page collects the rest of our guides, explainers, and project notes in this category.
Browse Battery Storage