Table of Contents
Lithium-ion batteries are awesome. They are low-cost and can store a lot of energy. Building a lithium-ion battery is fun and rewarding, and building a charger is no different. When you can build your own lithium-ion battery charger, experimenting with all kinds of cell configurations is a lot more practical. For some use cases, building a battery charger is often cheaper than buying one and can provide a lot more performance.
There are many benefits to building a DIY battery charger. First of all, the overall cost is often lower than buying one. Also, DIY battery chargers generally have a higher performance per dollar than pre-built ones. A DIY battery charger can be set to any voltage within the limits of the converter. This means that with a DIY battery charger you can charge many different types of batteries. Another great thing about building a DIY battery charger is the sense of accomplishment. A lithium-ion battery charger is important and somewhat complicated to understand. So, if you can build a DIY battery charger, it more than likely means you can do a lot of other cool things too. A DIY battery charger can even be used to power various devices. This means that if you can build a battery charger, you can also build power supplies for all kinds of things as the process is pretty much the same.
In this article, we will tell you how to build a DIY battery charger. We will also cover some battery basics and provide a detailed list of the benefits of building a DIY battery charger.
What Is A Battery Charger?
In the case of lithium-ion batteries, a battery charger is a constant current power supply. Lithium-ion batteries need to be charged in 2 phases. The first phase is constant current, where the voltage will go to whatever it needs to be to keep the current steady. The next and final phase is the constant voltage phase. This is when the voltage is kept constant and the current slowly falls to zero.
DIY Battery Chargers Vs Buying A Charger
When you buy a charger you are limited to that charger's specific voltage and current level. When you can build a charger, adjusting a given charger to meet a particular application is trivial. For example, a 3S NMC Lithium-ion battery has a max charge voltage of 12.6 volts. This works just fine but the cells will degrade after around 500 to 800 cycles.
Lowering the charge voltage to 12V lowers the capacity by about 20% but over doubles the cycle life, which may be better for some applications. Having exact control over the voltage and current gives you a great deal of flexibility when designing battery-powered systems.
Another thing to consider is that when using a pre-built battery charger, you are just trusting it. You are trusting it to be at the right voltage, and if it's not you are trusting your BMS to keep you safe. You are trusting that it's not charging your cells too fast or too slow, and there is no way to easily verify things without buying more stuff.
When building a DIY battery charger, you will need some way to monitor voltage and current in order to build it properly. This ensures that your DIY battery charger really is putting out the voltage and current that you think it is.
What Are The Benefits of Building a DIY Battery Charger?
Even if you are someone who would prefer to buy a charger rather than build one, it's still important for you to know how to build a battery charger. If you know how to build a battery charger, then you will have a clear understanding of the underlying concepts involved with charging lithium-ion batteries.
This knowledge will better prepare you for the purchasing process because you will know what to look for and what to avoid. Also, if you know how to build a battery charger, then you are going to know how to fix one, which can be handy.
Lower cost
Generally speaking, it will cost much less to build a charger compared to buying one. This makes sense because when you buy a charger, you are paying for the cost of the materials plus labor and other included fees that are related to running the company you are buying the charger from.
Any time you are willing to do some work to make something, the time that you put into the project is saving you money because that is money that would otherwise be paid to someone else to do what you’re doing.
Higher performance
Companies that build battery chargers are doing so for a profit. So, it is in their best interest to use the lowest quality components that are acceptable. This means that less popular brands will use bottom-of-the-barrel and sometimes even used electronic components to get the cost down as much as possible.
While it’s true that higher-end companies don’t do things that poorly, they still have a vested interest in driving component costs down as much as possible. When you are building your own DIY battery charger, these things do not apply. You have the full freedom to choose the highest quality components. The great news is that the money you are saving by building it yourself will more than offset the cost of choosing more expensive components.
Much more flexible
If you build your own DIY battery charger, it's more than likely going to be made with an adjustable voltage regulator of some kind. Whether it's a constant current boost converter or a constant current buck converter, either way, it will have settings. This means that when you build a DIY battery charger, you are building a multifunction device that can be used for many more things than just charging one type of battery.
A DIY battery charger can be set to charge any battery of any chemistry within its voltage limits.
Sense of accomplishment
There is almost nothing more satisfying than using a device that you built yourself. Especially when it works well and especially when you have to use it on a regular basis.
Learning a new skill
Any time you overcome an inability, that’s a major life upgrade. Going from not being able to build a DIY battery charger to be able to build one means that you can do new things. Expanding your horizons is always a good thing.
Other useful applications
In addition to being able to charge many different types of batteries, a DIY battery charger can also be a DIY adjustable power supply. All you have to do is turn the current setting on the regulator all the way up. Once the current is set to max, the regulator will function exactly like a constant voltage regulator.
In this mode, you could set your DIY battery charger to 12 volts and run any 12-volt device or set it to 5 volts and charge USB devices. When you build a DIY battery charger, the possibilities are endless.
Materials And Tools Needed To Build A Battery Charge
The parts needed to build a battery charger will vary based on the chemistry, voltage, and other factors of the battery you are considering charging. For this example, we will use the most common type of rechargeable battery chemistry: NMC Lithium-ion.
With NMC Lithium-ion chemistry, the max charge voltage is 4.2 volts. For the longest life, however, NMC cells should be charged to 4 volts per cell. Charging an NMC cell to 4 volts per cell reduces its capacity by 20% but it increases its overall lifespan by around 250%.
In this example, we will focus on making a charger that can charge a 3S NMC lithium-ion battery pack that has a maximum charge voltage of 12.6 volts.
Power Supply
To build a battery charger, the first thing you are going to need is an AC to DC power supply. There are many options for this. You can use an ATX computer power supply, a dedicated high-wattage AC to DC power supply, or even a low-cost, compact USB PD power supply. A battery charger is basically a power supply and a regulator combined into one unit.
We will go over all three in this article, but for the example, we are going to use a 65W USB-C PD power supply.
Regulator
You will also need a constant current regulator. The regulator will need to be a constant current buck converter if your power supply has a higher voltage than the battery you are wanting to charge. If, on the other hand, the battery you are wanting to charge has a higher voltage than your power supply, you will have to use a constant current boost converter.
In this example we will be working with a 20-volt USB PD trigger to charge a 12.6-volt battery, so the regulator will be a buck converter.
It's generally more flexible to start with a higher-than-required voltage and use a buck converter to take the voltage down to where you need it to be. This way you can access all the voltages between your input voltage and zero, rather than being limited to a band of voltages as you would be with a boost converter.
Wire
You will need some wire to connect it all together. For most battery chargers, 18 to 16-gauge wire will do just fine.
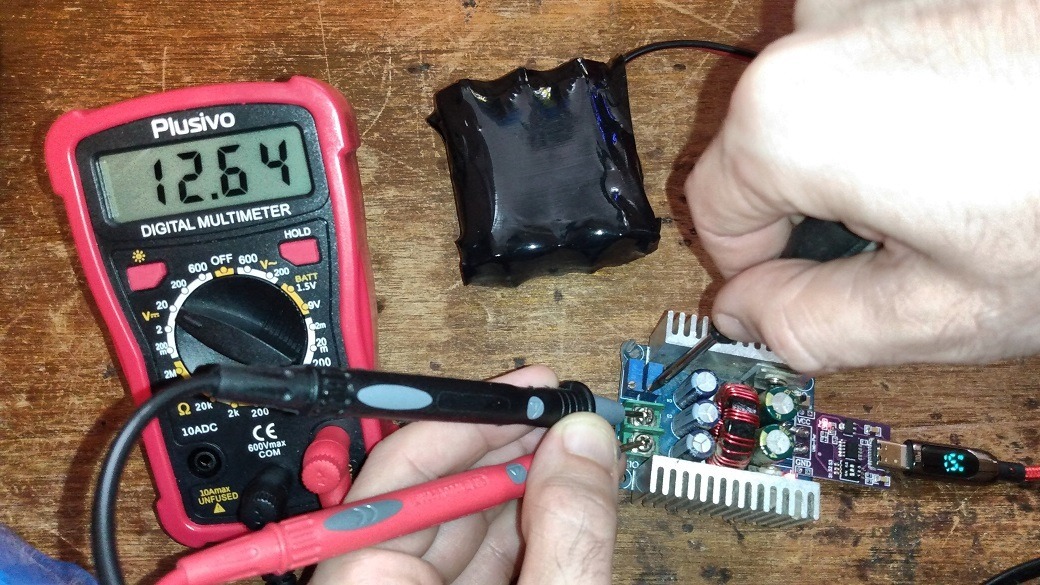
Multimeter
You will need a multimeter to set the output voltage of your regulator and to check your battery’s current voltage. You can use just about any multimeter for this as even the lowest-cost meters on Amazon are more than accurate enough.
The most important aspect of a cheap multimeter is for it to have a continuity beep. Continuity testing is a multimeter feature that lets you know if two conductive things are electrically connected or not. While measuring continuity is a critical multimeter feature that all multimeters will have, not every multimeter has a buzzer. So, with those meters you have to take your eyes off of what you are probing to know if they are connected or not. So, when buying a low-cost multimeter, make sure it has a continuity buzzer.
Current Meter
While it’s true that a multimeter can be used to check current, it's not a convenient process and you can’t use a multimeter to check current and voltage at the same time. Current meters like this are great tools and most certainly useful to have in your arsenal, but for this example, we are going to use a USB C to C cable with a built-in watt meter.
The Battery Charging Process
Charging a lithium-ion battery, whether it's NMC or LFP, involves a 2-stage process. The first stage is the constant current phase. During the constant current phase, the battery will receive a steady amount of current from the charger. The amount of current that a battery can safely take during this phase is determined by the battery cell's maximum charge current and its parallel configuration.
Once the battery voltage rises to around 95% of the target voltage, charging switches to constant voltage mode. In the constant voltage phase, current will naturally fall from the set current level to 0 while the voltage is held the same.
In this example, we will be using BAK N18650CK battery cells which have a maximum charge current of 1C and a capacity of 3050 ma. It’s a 1S3P battery, so that means the battery is composed of just three BAK N18350CK cells in series.

If it were a larger battery with more parallel groups, it could safely charge at a faster rate. For example, here is how it breaks down with a 3S3P battery using the same cells:

When an NMC lithium-ion cell is dead, its voltage is about 2.6 volts. So if the cell can only be charged at 3.05 amps and its voltage is 2.6 volts, then it can only be charged at a maximum of 7.93 watts.

After some time in the charging process, the voltage of the battery cell will increase. When the cell reaches 2.9 volts, the charger will still be providing 3 amps.

During the constant current phase battery cells are being charged at their maximum rate in terms of current but as you can see from above, as the battery voltage rises, more and more energy is going into the battery. Once the cell reaches the set voltage of the charger, the current starts to fall, causing the battery cells to absorb less and less energy.
Picking A Power Source For A DIY Battery Charger
The first step in building a battery charger is getting a decent power supply. There are many options to choose from but we will cover three in this article: An ATX power supply, a dedicated power supply, and a USB C PD power supply.
ATX Power Supply
Modern PC ATX power supplies are well built, low cost, and support high current levels. It's not uncommon to find an ATX power supply able to do 20A or more for less than 50 dollars. To turn an ATX power supply on the outside of a PC, all you have to do is connect the green wire to any black wire.
Doing this tricks the power supply into thinking that it's installed in a computer that has been turned on. The yellow wire is 12 volts and is generally good for 10 to 20 amps. ATX power supplies are convenient to use because it's common to have old, unused computers around the house.
Dedicated Power Supply
There are many 12-volt, 24-volt, and adjustable dedicated power supplies available on Amazon and eBay. This type of power supply is generally larger than an ATX power supply, but they are arguably easier to work with as they require no modifications. Also, unlike ATX power supplies, a dedicated power supply can output more than 12 volts.
This is useful if you are wanting to use a buck converter to charge batteries that are higher than 12 volts but lower than 24. A dedicated power supply is a good solution for a high-power battery charger.
USB C PD Power Supply
A full-spec USB C PD power supply can provide selectable output voltages of 5 volts, 9 volts, 12 volts, 15 volts, and 20 volts. Unlike ATX and dedicated power supplies, there are many GaN (Gallium Nitride) USB C PD power supplies on the market. GaN power supplies are much more efficient and consume much less space than power supplies using traditional silicon MOSFETs.
This means that a small USB C PD power supply can provide 100W of energy, whereas a traditional power supply of the same physical size would only be able to provide about 40W. USB C PD power supplies have the added benefit of being compatible with a wide range of other USB C devices such as phones, tablets, and even laptops.

How To Build A Battery Charger Step By Step
In this step-by-step guide, we will cover how to build a battery charger that can charge any lithium-ion or lead acid battery that supports charging voltages between 2.6 volts to 19 volts. This range may sound narrow, but it actually covers quite a few batteries. This charger can charge either a 1S, 2S, 3S, or 4S NMC lithium-ion battery or a 1S,2S,3S,4S, or 5S LFP lithium-ion battery. It can even charge 12-volt lead acid batteries. To help figure out what voltage you need to charge your battery pack to you can use our battery planner tool.
USB PD supports 5 volts, 9 volts, 12 volts, and 15 volts, but not all power adapters that have USB C ports support the entire USB PD specification. For charging batteries we recommend using a USB C PD power supply that is good for at least 65W. The good news is that if a USB C PD power supply is rated for 65W, then it will support the full voltage range.
USB PD is a smart power solution. It starts off at a safe 5 volts and then it asks the device it is connected to what voltage it supports. Once the device responds, the USB PD power supply chooses the requested voltage.
This is convenient for device-to-device communication and allows a seamless, automatic voltage negotiation to take place. USB PD, however, supports small devices called ‘triggers’. Triggers connect to a USB PD supply through a USB C cable and either have a way to select the voltage on the board or have a fixed voltage. In this example, we will be using the selectable variety.
A constant current buck converter will be used for this example. This type of converter has potentiometers to control the current and voltage. The potentiometer closest to the output controls the voltage. The other controls current. When you get a new buck converter, it's best to turn these dials all the way down before you attach them for the first time.
Parts Required:
- USB PD Power Supply
- USB PD Trigger
- Constant Current Buck Convert
- USB PD Watt Meter Cable
- 3S Lithium-ion battery
Step 1: Plug the USB PD power supply into the wall.
Step 2: Plug the USB C to C watt meter cable into the USB PD power supply.
NOTE: This cable has a screen on one end of it that tells you how much power is running through the cable. You want the screen at the device end and not at the power supply end because the cable only reads power flowing in one direction. It's normal for the screen to be off when the cable is connected to only the power supply.
Step 3: Plug the USB C cable into the voltage trigger.
NOTE: This is when the screen on the power meter cable will come on. Some triggers have a fixed voltage output but this trigger is selectable. It’s convenient to be able to set the trigger voltage to easily upgrade/mod household electronics to run on USB PD, but for battery charging it's best to set the voltage to 20 volts so that the maximum amount of wattage is available from the power supply.
Attach a multimeter to the voltage trigger output to make sure it’s outputting the expected voltage.
Step 4: Put a connector on the output of the voltage trigger or solder wires to them so that it can be connected to the buck converter’s input.
Step 5: Attach the voltage trigger’s output to the buck converter’s input and turn the buck converter on using the switch on the corner of the board.

Step 6: Attach a multimeter to the output of the buck converter. If you took the advice above and turned it all the way down, then you should see about 1.5 volts on your multimeter. Rotate the outer potentiometer clockwise and the voltage will rise.
Step 7: Continue to turn the potentiometer until you reach your desired maximum charge voltage. In this case, it's 12.6 volts.
Step 8: Attach the battery to the output of the buck converter.
NOTE: Because the current is set to zero, you will notice that the output of the buck converter drops to match the battery voltage. This is normal.
Step 9: Slowly turn the current potentiometer until you start to see the numbers on the watt meter cable start to rise.

NOTE: As far as what number to bring it to, that takes some math. This number is in watts, not amps. The battery in this example is good for about 3 amps of charging current and is currently at 9.71 volts.
9.71 volts x 3 amps = 29.13 watts
So in this example, we will turn the potentiometer until the watt meter reads 30 watts. Now, remember, the current will stay the same during the majority of the charging process but the battery's voltage will rise. This means that it's normal to see the watts on the meter rise and rise during the charging process.
Eventually, the battery’s voltage will reach the target charging voltage, and then you will see the wattage start to fall. This is how you know the battery is done charging.
Easy Lithium Battery Charger Using A Bench Power Supply
While it's great to know how to build a DIY battery charger, it sure is a lot of work. So, if you want all the benefits of making your own battery charger with minimal work, then you should buy an adjustable benchtop power supply.
With an adjustable bench power supply, you can do exactly what is described in this article but a lot easier. All you have to do is buy the power supply, set the voltage and current to where you need it to be, and hook it up to your battery.
Just make sure that whatever bench power supply you are looking to buy supports a voltage range that is compatible with whatever battery you are trying to charge with it and that it has CC/CV (constant current, constant voltage). This solution basically takes all the pieces and parts that are described in this article and puts them all in one convenient box. The great thing about this type of power supply is that they always have clear, easy-to-read built-in screens.
Conclusion
That’s it! It’s as simple as that to build a battery charger. Of course, there are many different ways to build a battery charger and many different types of batteries to charge. The one built in this example can be easily tuned to charge a 4S LFP battery pack simply by increasing its output voltage to 14.6 volts.
When you learn how to build a battery charger, you learn how to take control over voltage and current and make it do exactly what you need to do. The experience is rewarding and extremely useful in practical, everyday life. It’s important to remember that a battery charger is really just a special kind of variable power supply. A standard variable power supply is just a constant voltage regulator. This means that with most variable power supplies, you have no control over the current. Building a DIY battery charger is slightly more advanced than using a variable power supply because in a DIY battery charger, you can control both the voltage and the current.
Building a DIY battery charger provides several key benefits. Economically speaking, putting the work in yourself will always save you money compared to buying a pre-built product. Being able to choose your own components without having to cut corners to meet specific production metrics means that you can ensure that your DIY battery charger is made from the highest quality components possible. A lithium-ion battery charger is no simple device. So, if you learn what it takes to be able to build a DIY battery charger, you are drastically increasing your abilities, which is always a good thing. Also, Setting the current to maximum on a constant current voltage regulator makes that regulator no different than a constant voltage power supply. This is, of course, not good for charging batteries, but it means that a DIY battery charger can be used for more than just charging batteries.
We hope this article helped you learn everything you need to know about how to build a battery charger. Thanks for reading!
Turn the guide into a real build plan
If this article is part of an actual battery, powerwall, or pack-design project, the next step is usually moving from theory into the calculators and planning tools.
Battery Storage
If this article sent you down a deeper rabbit hole, the topic page collects the rest of our guides, explainers, and project notes in this category.
Browse Battery Storage