Table of Contents
If you are wanting to work with lithium-ion batteries but you are light on cash, then you can always learn how to disassemble lithium-ion battery packs. If you know how to take apart a lithium-ion battery, you can save yourself a lot of money on cells by buying bad battery packs and equipment that contains them for cheap.
Taking apart a lithium-ion battery pack may appear challenging at first, but with a solid approach and some patience, anyone can do it. It’s super important to understand the connections between battery cells and to recognize the potential risks, like shoulder shorts.
Once you've mastered the art of separating, cleaning, and testing the reclaimed cells, a world of possibilities opens up. This approach not only helps you save money, but it also supports a more environmentally conscious use of resources by repurposing once-discarded battery cells. Learning how to disassemble lithium-ion battery packs is a highly valuable skill for DIY enthusiasts and those interested in eco-friendly practices, as it allows you to create something innovative from previously discarded components. And besides, it's fun!
In this article, we will go over how to disassemble lithium-ion battery packs. We will also shed some light on how batteries work and what makes a used battery different from a new one.
Are There Good Cells In Bad Battery Packs?
Yes! When a battery pack 'goes bad' it's usually because the BMS has decided to shut it off for one of many reasons. This is why it’s a good idea to disassemble lithium-ion battery packs for its cells. In most other cases, just a single cell has failed. Remember, battery packs are made of many cells that are grouped in a specific way.
So, if one cell dies, it will bring down the cells that it is immediately attached to. This is bad news for the cells in that group but it's good news for the rest of the battery pack. It generally means that the other cell groups are just fine.
How To Disassemble Lithium Ion Battery Packs
Lithium-ion battery packs are spot welded together. So it's no small feat to separate the cells. In fact, breaking down a lithium-ion battery pack is a rather involved process that takes care and patience. You have to be extremely careful when breaking down a lithium-ion battery pack. If you're not, then you will easily short out cells. When you are working on the cell level, there is no BMS there to protect you. So proceed with caution and safety first!
While it’s true that you don’t need any specialty tools to disassemble lithium battery packs, you do need some specific tools.
Tools Required To Break Down Lithium Ion Battery Packs
When breaking down a lithium-ion battery pack, having the right tools for the job is critical. The tools you use to disassemble a lithium-ion battery pack can be the difference between salvaging a bunch of great cells and starting a fire.
- Flush Cut Pliers
 Flush Cutters
5 pack of flush cut pliers. Perfect for removing the nickel strip that is attached to cells when salvaging.
Check price
- Silicone gloves
 Safety Gloves
Twelve pack of rubber gripped safety gloves.
Check price
- Multimeter
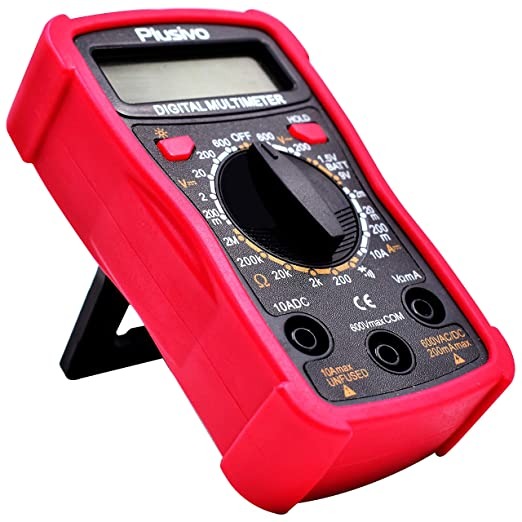 Multimeter
Measures AC & DC current. Backlit display. Ability to retain the last measured value.
Check price
How To Set Up A Proper Battery Disassembly Work Area
Your work area should be somewhere that is clean, well-ventilated, and far away from any flammable materials or liquids. Make sure your work surface is sturdy and does not wobble. It’s a good idea to keep your multimeter, soldering equipment, and other tools all in one place that is easy to access but not in the main work area.
Also, you are going to need a dedicated battery charging and testing station that is separate from the teardown area. Workflow is important. Come up with a method to clearly label and categorize cells based on their capacity, internal resistance, and other characteristics. Doing this will make it a lot easier to match cells for your projects.
Battery packs are not pretty inside and they have lots of sharp corners and jagged edges. So, it’s good to have one of those self-healing cut mats so you don’t tear up whatever table you are working on.
How To Remove Cells From Lithium Ion Battery Packs
If you are wondering how to remove cells from lithium-ion battery packs, the first answer is 'Very carefully.' A BMS protects a battery pack (and the user) from 99 percent of things that can cause fire and serious injury. When you are breaking down a lithium-ion battery pack, you are basically dealing with the other 1 percent. There is no BMS there to protect the battery, you, your house, or your family. So, when you are breaking down a lithium-ion battery pack, proceed with caution.
If you accidentally short out a complete battery pack with a BMS, you might make a big spark, temporarily disturbing your vision, and could possibly receive a small burn. If you short out a battery without a BMS, however, one of two things will happen. Either the connection that you shorted out will vaporize and burst into flames or the battery cell will become overloaded and 'vent with flame'. There is no third option and you definitely want it to be the first one.
If you short out a cell or group of cells without the protection of a BMS either a very small very bad thing will happen or a very large bad thing will happen. Either way, it's something to avoid.
Step 1: The very first step is to remove all supporting wires and other connections to the battery. Whatever the main battery pack is electrically connected to, remove it. Remove any circuit boards, regulators, lights, wires, or anything else there is, and get it down to the raw battery pack.
Step 2: Mask off the area that you are not working on with Kapton tape or any other easily removable adhesive insulator. This makes it so that if you drop a piece of metal on the battery pack, the chances of a short are highly reduced.
Step 3: Use needle nose pliers to carefully roll back the nickel to peel off the welds. Do this with EXTREME caution on the positive end, as it is very easy to short out the cell through its shoulder. Make sure to always pull up and away from the battery pack, and be patient with the pieces you are trying to remove. Remember, the entire point of spot-welding a battery pack together is to make a strong connection. So, it's normal for this phase to be hard.
Step 4: Now it's time to remove the nickel still left on the cells. Use the sheer snips to cut the nickel off of the top of the cell as flat as possible. In some cases, you will find that you can use the sheer snips as tiny grabbers to pull the small pieces of nickel completely off the cell for a totally smooth finish. The goal is to get the ends of the cells as flat as possible.
How To Test Salvaged Lithium Ion Battery Cells
When testing a battery cell, start with a visual inspection. Inspect each cell for rust or signs of leakage and discard any damaged cells. After that, do a voltage check to make sure the cell is between 2.5 and 4.2 volts. Then, do a charge test and make sure they don’t get too warm while they are charging. Let each cell charge to 4.2 volts, then let them sit for a day or two. If the voltage falls by more than 0.1 or 0.2 volts, the cell may have a high degree of self-discharge.
It's recommended to not use a chargers internal resistance check and to get a dedicated IR tester. New lithium-ion batteries have an internal resistance between 25 and 50 mOhms, while a used but healthy battery ranges between 50 and 80 mOhms. Cells with internal resistance above 90 mOhms are considered to be nearing the end of their life.
Can You Repair A Lithium Battery Packs Before You Decide to Disassemble It?
For sure, you can fix lithium battery packs! First, you need to figure out what's wrong with the pack—either bad cells or a wonky Battery Management System (BMS). If it's the BMS, just swap it out with a new one. The BMS keeps an eye on the battery pack's performance and makes sure everything's working within safe limits. Replace the bad BMS, and your battery pack should be good to go.
If you've got bad cells, though, you'll need to swap them with matched cells. The process is more involved as the cells are welded together, but it's definitely possible. It's super important to use cells with similar capacity, internal resistance, and voltage so the battery pack stays balanced and performs well. Once you've got the new cells in, your lithium battery pack may not be as good as new, but it will perform about as well as it did before it totally failed.
So yeah, repairing lithium battery packs is not only doable but also a smart and eco-friendly way to keep using them.
Conclusion
Anyone looking into building batteries while saving some cash is going to need to know how to break down lithium-ion battery packs.
The good news is that breaking down a lithium-ion battery pack is fairly straightforward. It can be very dangerous if you rush it, so it takes patience. No special tools are required, but it's helpful to know how the batteries are connected and some things to avoid, like shoulder shorts. After carefully separating, cleaning, and testing the salvaged lithium-ion cells, you will be able to use them for your project.
We hope this article helped you learn how to break down lithium-ion battery packs. Thanks for reading!
Turn the guide into a real build plan
If this article is part of an actual battery, powerwall, or pack-design project, the next step is usually moving from theory into the calculators and planning tools.
Battery Storage
If this article sent you down a deeper rabbit hole, the topic page collects the rest of our guides, explainers, and project notes in this category.
Browse Battery Storage