Table of Contents
Wiring lithium batteries in series is a really straightforward way to increase their voltage. If you’re looking at boosting voltage—for example, getting 7.4 volts from two cells or even 12.6 volts from three cells—this method is super important. Lithium batteries are part of our everyday gadgets like phones, laptops, and even electric cars, so knowing how to wire them in series is essential for any practical project.
To wire lithium batteries in series to increase voltage, connect the positive terminal of one battery to the negative terminal of the next. This setup means the voltage of each battery adds up, giving you the higher voltage you need for your project, but the amp-hour rating stays the same. By creating a chain of batteries where you have one free negative terminal at one end and one free positive terminal at the other, you’re setting up a system that increases overall power output, which is measured in watts.
If you’ve ever thought, “How to wire lithium batteries in series to increase voltage?”, the answer is to simply link them positive to negative in a chain. This basic knowledge opens up a lot of possibilities when working with lithium batteries in various applications.
Benefits of Increasing Voltage with Series Wiring
When building a battery pack, you are going to have to wire lithium ion batteries in series. In doing so, you will be adding up the individual voltages. You will have to do this if you plan on powering devices that need more juice than a single cell can offer.
Higher voltage makes it possible to run equipment like inverters, motors, and various electronics that wouldn’t work well on a lower voltage supply. For example, many inverters need at least 11 volts, and wiring multiple lithium cells in series helps you easily hit that mark.
Another great benefit is that, even though the voltage goes up, the amp-hour capacity stays the same. What this means is that the total power output—calculated as voltage times amp hours—increases. This extra power can be a real game-changer when you need more wattage for demanding applications.
Wiring batteries in series also gives you flexibility. Whether you’re using three cells for a simple task or connecting 20 or more for a more complex setup, you can customize your battery pack to match your voltage requirements. It’s an easy and effective way to step up your battery’s potential without having to switch to a completely different battery type.
Overall, understanding and using series wiring for lithium batteries not only helps in getting the voltage you need but also maximizes the power output to make your project run smoother and more efficiently.
So then, of course, the question comes to: ‘How do you increase the voltage of a lithium-ion battery?’ If you want to start effectively using lithium-ion batteries at reasonable voltage levels and have them power the vast majority of electrical devices that require a voltage level higher than that which a single lithium-ion cell can provide, you will first have to learn a little bit about series and parallel cell connections in general.

If you're ready to learn how to wire lithium batteries in series to increase voltage, follow these simple steps. This guide is perfect for anyone wanting to connect individual lithium cells step by step. Make sure to be be cautious and methodical, so let’s get into it!
Step 1: Gather Your Materials and Tools
Before you begin, make sure you have everything you’ll need. You’ll need your lithium-ion cells, a set of insulated wires or metal strips (nickel or copper), a spot welder or good soldering iron (if needed), and basic safety gear like gloves and eye protection. Double-check that all cells are in good condition and charged equally to avoid any imbalances later.
Step 2: Identify Terminals and Plan Your Layout
Examine each battery to find the positive (+) and negative (–) terminals. Sketch a quick diagram to see how the cells will link together. Remember, connecting the positive terminal of one cell to the negative terminal of the next is the key. This will create a chain that adds up the voltages, while the overall amp-hour rating stays the same.
Step 3: Make the First Connection
Take your first two cells. Connect the positive terminal of the first cell to the negative terminal of the second cell. Use your chosen method (spot welding or soldering) to secure the connection. This is the basis of creating your series chain, so make sure the connection is solid and reliable.
Step 4: Continue the Series Connection
Repeat the process for all remaining cells. Each new connection should follow the rule: the positive terminal of the current cell connects to the negative terminal of the next one. Once all cells are connected, you will have one free negative terminal on the first cell and one free positive terminal on the final cell. These are the main terminals that sum up the voltage from each battery.
Step 5: Double-Check Your Connections
Go over each connection carefully. Ensure there are no loose wires or accidental shorts. Use a multimeter to test the voltage between your free terminals. The reading should equal the sum of the individual cell voltages, proving that your cells are correctly connected in series.
Step 6: Integrate a Battery Management System (BMS) If Needed
If your kit or application involves an integrated BMS, connect it according to the manufacturer’s instructions after you've set up your series chain. The BMS helps monitor each cell, ensuring balanced charging and discharging, which is crucial for efficiency and safety.
Step 7: Final Tips and Testing
Now that all connections are in place, it’s time to test your work. Slowly charge the pack and monitor it to ensure all cells are behaving as expected. Keep an eye out for any issues like unusual heating or voltage drops. Regular testing and maintenance are key to a long-lasting battery pack.
This step-by-step approach should help you confidently wire lithium batteries in series to increase voltage. Just remember: work carefully, always double-check your work, and stay safe. Happy building!
Understanding How Series Connections Work
When you wire lithium batteries in series, you simply add up the voltage of each battery while the amp-hour capacity stays the same. Think of it like linking a chain: you connect the positive terminal of one cell to the negative terminal of the next, and that’s it! This creates one continuous path for the current, with the overall voltage being the sum of all individual cell voltages.
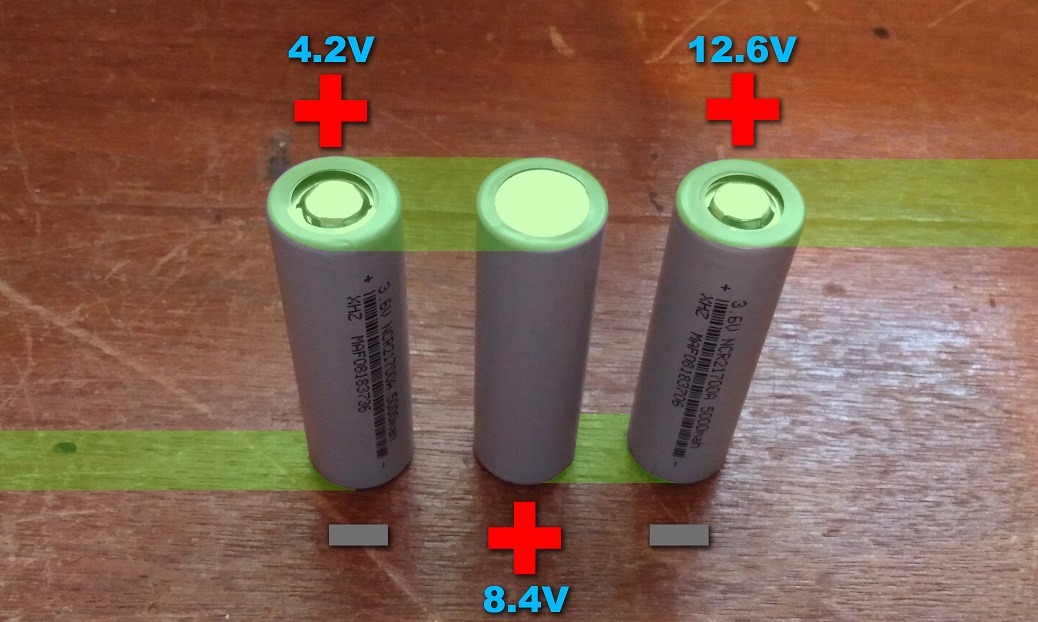
For example, let’s say you have three lithium-ion cells, each at 3.7 volts. The first cell gives you 3.7 volts, and by connecting the first cell’s positive to the second cell’s negative, the second cell’s voltage shifts up by 3.7 volts too. When you add the third cell the same way, the total voltage from the open negative terminal on the first cell to the open positive terminal of the third cell reaches 12.6 volts.
It’s also key to understand that even though the voltage increases, the amp-hour rating doesn’t change because that’s a property of the individual cells’ capacity. In other words, while the power (or wattage) output increases thanks to the boosted voltage, the overall energy storage remains the same.
Another way to see it is to imagine each cell as a little battery “step.” When you put them together in series, you’re basically climbing stairs—the more cells you add, the higher you climb. But no matter how many steps there are, your pace (or current capacity) stays consistent.
Always remember to double-check your connections with a multimeter to ensure that the full voltage reads correctly from the first cell’s negative to the last cell’s positive terminal.
NEVER connect the + and - from the same cell together. Also, never connect the - connection of a set of series-connected cells to the + connection on the other end. Doing either of these things will more than likely lead to an immediate fire.
The positive side of the second cell is 3.7 volts higher than its negative side, so if you measure the voltage between the negative of the first cell and the positive of the second cell you will get 7.4 volts.
The process is the same when adding the third cell. Simply connect the positive from the second cell to the negative of the third cell. This will raise the third cell’s negative side to 7.4 volts. Just like the second cell, the third cell’s positive side will be 3.7 volts higher than its negative side. This means that if you measure the voltage between the negative side of the first cell and the positive side of the third cell, you will get 12.6 volts.
How To Wire Lithium Batteries In Series
The connections needed to wire batteries in series are the same for wiring cells in series. It’s a matter of connecting positive to negative in a chain whereas attaching cells in parallel is + to + and - to -. There are, however, some additional things that need to be taken into consideration when wiring batteries in series.
This is because complete batteries have a BMS installed. The BMS, or battery management system, is responsible for controlling when a battery can be charged or discharged. In order to provide this control, a BMS uses a component called a MOSFET (Metal Oxide Semiconductor Field Effect Transistor) to control the flow of current into and out of the battery.

MOSFETs come in a wide variety and are rated for a particular amount of voltage and current. When two batteries with BMS are put in series, as long as both batteries are not dead, everything will work fine. Each set of BMS MOSFETs will see their normal voltages and when you put their outputs in series, you will see their voltages added and you can run higher voltage equipment with no problem.
The moment either one of those batteries dies, however, you are going to run into an issue. While a MOSFET is active, it has an extremely low resistance and is basically just a wire. This allows current to freely flow, so the higher voltage coming in from the first battery goes into the second battery without a problem. When either one of the batteries dies, though, its MOSFETs will be switched off and they will go into a high resistance state, which prevents current from flowing.
When this occurs, the MOSFETs on the BMS of the dead battery will experience the full voltage of the battery that is not dead plus the voltage of the cells in the dead battery. If the MOSFETs cannot handle this higher voltage, they will be damaged. Alternatively, you could choose the right BMS for the voltage of the two packs in series, remove each pack's individual BMS and rewire with the new higher voltage BMS.
So, in review, wiring lithium batteries in series is just as simple as wiring lithium cells in series. The difference is that lithium batteries have a BMS which contains MOSFETs that might not be able to handle the higher voltage that they would experience when one battery dies. This means that as long as you make sure neither battery dies during operation, it's fine to use lithium-ion batteries in series.
Alternatively, if you can verify that the MOSFETs in your BMS are able to handle the higher voltage, then you have nothing to worry about at all.
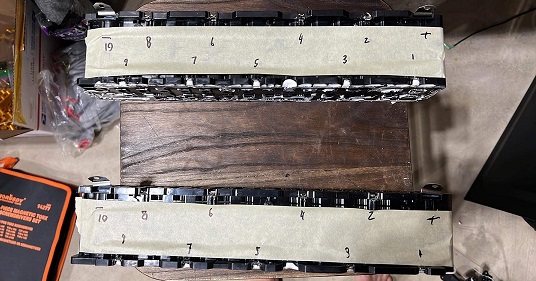
2 battery packs preparing to be w
Safe Charging Techniques for Series-Connected Lithium Batteries
Making sure you charge your series-connected lithium batteries safely is obviously an important part of the process. When you wire batteries in series, the charging voltage gets divided across each cell. This means that if you don’t balance them correctly, one battery might get overcharged while another remains undercharged, which can lead to hazards or shorten the battery life.

But it doesn't always go as planned! There are many situations in which a damaged battery can cause the other battery or batteries to overcharge.

Use a Charger Rated for the Total Voltage
When charging a battery pack made up of several lithium-ion cells in series, always use a charger designed for the combined voltage. For example, if you have three 4.2-volt cells in series, you’ll need a charger that offers 12.6 volts. Using the wrong charger can damage your cells.
Balance Charging Is a Must
To keep everything safe, balance charging is key. A balance charger monitors each cell individually, making sure every cell gets just the right voltage. This helps avoid the problem of one battery being overcharged and helps extend the life of your battery pack.
Keep an Eye on Cell Health
Regular checks are important. Use a multimeter to test the voltage of each cell, making sure they all stay within safe limits. If one cell starts to lag behind or rise above its safe voltage, it might be time to swap it out before it triggers any safety issues.
Integrate a Reliable Battery Management System (BMS)
For extra peace of mind, add a good BMS to your setup. The BMS keeps track of each cell’s temperature, voltage, and current flow. This system helps balance the charging process by redistributing the voltage if one cell gets a bit ahead of the others. Make sure your BMS is rated for the total pack voltage, and always follow the manufacturer’s guidelines for connecting and charging.
Avoid Overcharging and Deep Discharging
Overcharging beyond 4.2 volts per cell or discharging the battery too deeply can cause serious damage. Most chargers have built-in cut-off mechanisms, but it’s a good idea to double-check that your electronics are working properly. Charging within the recommended voltage range will save your batteries and ensure safe operation.
Monitor Temperature Throughout the Process
Temperature plays a big role in charging safety. If you notice any unusual heating during the charging process, stop immediately and check your connections and cells. Keeping cool not only protects your batteries but also lets the charger work efficiently without risk.
By following these safe charging techniques, you can make sure your series-connected lithium batteries stay safe and perform at their best. Remember, using the right charger, balancing each cell, and monitoring temperature and voltage are all very important things to consider if you want to keep your battery healthy and effective!
Conclusion
To connect lithium-ion batteries in series, all you have to do is connect the positive connection of the first cell to the negative connection of the next one. An infinite number of cells can be put in series, and common series configurations are between 3 and 20 cell groups in series. When connecting lithium-ion batteries in series, an open-ended chain is formed that will have a free connection on either end. These end connections are the battery’s main negative and main positive connections. Adding battery cells in series adds their voltages together while not changing the amp hours. It’s important to consider, however, that because power is a measure of volts multiplied by amp hours, putting lithium batteries in series increases the overall power by increasing the overall voltage.
We hope this article helped you learn more about how to wire lithium-ion batteries in series. Thanks for reading!
Turn the guide into a real build plan
If this article is part of an actual battery, powerwall, or pack-design project, the next step is usually moving from theory into the calculators and planning tools.
Powerwalls
If this article sent you down a deeper rabbit hole, the topic page collects the rest of our guides, explainers, and project notes in this category.
Browse Powerwalls