To build a DIY powerwall, start by estimating your load current and selecting an appropriate system voltage. Source the necessary battery cells, either 18650 NMC or LiFePO4, based on your requirements. Gather tools and supllies like a multimeter, soldering iron, spot welder, and necessary parts including a BMS, powerwall cable wires, Kapton tape, and a heat gun. Choose an inverter suitable for your load.
18650 cells are typically welded together, while LFP prismatic cells can use bus bars for connection. Attach the BMS with its balance leads and connect the inverter using thick wires to handle the load. Configure and connect the charge controller to safely charge the powerwall. Finally, wrap and secure the battery pack, ensuring all components are properly connected and tested.
If you have been wondering how to build a DIY powerwall, then you’re in the right place. Whether built with LFP cells or regular ole’ NMC 18650s, planning and building a DIY powerwall is a fun and rewarding experience. When you build a DIY powerwall, you will also save yourself a lot of money compared to buying one that’s already made for you. Check out our other articles for a thorough comparison between DIY Powerwalls and Prebuilt Powerwalls
In this article, we will go through all the steps required so that you can know how to build a DIY powerwall. We will cover how to build a powerwall with both NMC 18650 and LFP prismatic cells.
This one is a must-have for any electronics work. No matter how basic or complex you plan on getting, you need to have a multimeter. A multimeter will allow you to test for voltage, current, resistance, and many other useful things that are critical to working on batteries such as continuity.
Soldering Iron
Not all soldering irons are created equally. While it's true that you don't need a very high-end soldering iron to build a DIY powerwall, it's good to avoid soldering irons that plug directly into the wall. Generally speaking, if a soldering iron plugs directly into the wall, then it has no temperature regulation.
So, when it comes to building a DIY powerwall, you can use any soldering iron that has some sort of accompanying regulator box and is 60W or higher.
Spot Welder
The kWeld is pretty much the best spot welder for building battery packs. That’s because the kWeld is high enough power to do thicker nickel and even some copper. If you are wanting to build a DIY powerwall, however, you do not need a kWeld.
This is because powerwall batteries are generally physically large batteries that have many cells in parallel. As you have more space for electrical conductors in a battery and have more cells connected in parallel, the requirements for welding performance are lowered.
Because of this, any medium-level spot welder that costs around 80 dollars or more can be used to build a DIY powerwall.
Parts Needed To Build A DIY Powerwall
Battery Cells
The battery is the most important part of a powerwall. Whether you are using 18650 NMC cells or LiFePO4 prismatic cells, you are going to need to make sure that your cells can support the current that your load will require.
Don't be super discouraged if you calculate your load and find out that your battery needs to be able to do 60 amps. Remember, the load current is distributed among all of the cells that are in the parallel groups.
So if you need 60 amps and you only have cells that can do 10 amps each, all you have to do is put 6 of those cells in parallel. But it's important to not max out anything, especially battery cells. So why not throw one more cell in parallel just to keep everything cool?
Powerwall Cable Wires
While it's true that a welded battery does not require wires for its main series and parallel connections, you will still need wires to connect the ends of the battery to the BMS. You will also need wires to connect the BMS to your charge and discharge connector.
The size of the wire that you need depends on your load current, system voltage, and the lengths of the wire runs. Generally speaking, 16 to 10-gauge wiring is used to create DIY powerwalls. The higher voltage of a battery you have, the thinner your power wires have to be. At first, this may sound backwards.
It seems like a higher voltage would need bigger wires. But if you think about it, voltage is more like the 'speed' of electricity. Amps are more like that 'amount' of electricity in a given section of wire. So, if the speed is higher, then the amount can be smaller while still transferring the same amount of power.
BMS
The BMS is a critical component of any battery and is required for safe, reliable operation. The BMS prevents the battery from being over or under-charged. It also makes sure the load does not exceed the battery’s maximum current level among other protections.
Miscellaneous Supplies
You will need Kapton tape and strapping tape for the battery. You will also need some PVC wrap and a heat gun to finish and seal up the battery after you're done building it.
Picking A Size/Capacity For Your Powerwall
There are several ways you can go about picking a battery size or inverter capacity. You could always overbuild so you don't have to worry about it at all. You could just build a massive battery that you know you could never drain. You can also use our battery pack planner tool to virtually build your battery before you start.
The problem with that is that these parts are not free and neither is your time to put it together. For this reason, it's important to know how to size a powerwall.
So, for the 2000W example running at 24 volts, if you wanted to run that load for a full 24 hours, the math goes as follows:
An 83 amp load will use 83 amp-hours in one hour. So if you want to run an 83 amp load for 24 hours, you are going to need a battery that contains at least 1992 amp hours of energy storage.
For the 400W example running at 12 volts, if you wanted to run that load for a full 8 hours, the math goes as follows:A 33 amp load uses 33 amp-hours per hour. If your load requires 33 amps and you want to run it for 8 hours, you’ll need a battery that can store at least 266 amp hours of energy.
Picking A Powerwall Voltage
The higher the voltage, the less stress on every part of the system. Also, the higher the voltage the smaller the wires you need. So, when picking a voltage, you want your voltage to be as high as possible.
It is important, however, to consider that the cost of inverters, BMS, and other system components in some cases may increase as system voltage increases. For small loads under 300 or 400 watts, it's reasonable to use a 12-volt system.
Anything approaching or over 500 watts really needs at least 24 volts. This is because as the voltage is doubled, the required current is halved for a given amount of power. Here are some examples showing a 500-watt load at various voltages:Determining Powerwall Current Load
Current is watts divided by volts. So if you have a 2000W load, you can do some simple calculations to find out how much current various configurations will require. For instance, if you are considering going with a 24-volt system, then your load current will be about 83 amps. In contrast, if you go with a 48-volt system, then your load current will be about 41 amps.
In another example with a 750-watt load, a 12-volt system would require 62.5 amps whereas a 24-volt system with the same load would only require just over 31 amps.What Type Of Cells To Use For DIY Powerwall?
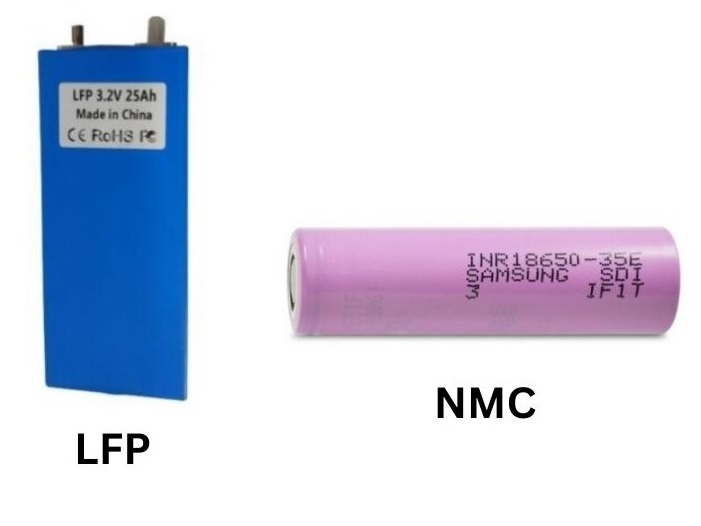
NMC 18650 Lithium Ion Powerwall
NMC 18650 cells are by far the most common cell to use to build a powerwall. 18650 powerwalls are so common because 18650 cells are the most common type of lithium-ion battery. 18650 cells are made by the thousands per minute.
They are quick and easy to manufacture because they are made in a cylinder that can easily roll through high-speed machines. 18650 cells don't have a massive capacity, but they are cheap and small enough to add many of them in parallel. If you are building a powerwall battery from used cells, it will more than likely be with NMC 18650 lithium-ion cells.This is because traditional NMC lithium-ion cells have a fully charged voltage of 4.2 volts and a dead voltage of around 2.6 volts. In order to get anywhere close to 12 volts, you will have to add 3 NMC lithium-ion cells in series.
This gives a fully charged voltage of 12.6 volts which is close enough to 12. The problem is, shortly after you start using a 3S NMC lithium ion battery, the voltage will fall below 12 volts. What's even worse is that this kind of battery will die at around 7.5 volts. This is far too low to run 12-volt equipment. I will explain:
If your battery voltage starts at 12.6 volts, that is fine for 12V equipment. Just about anything made to run on 12 volts will not have any problem running at 12.6 volts. The same equipment will probably work fine at 11.5 volts, but that's when things start to go south.
Once the voltage starts to fall much lower than that, 12-volt devices begin to run less and less efficiently. At some point, around 10.5 volts, 12-volt devices won't run at all. The most common 12-volt device to run on a DIY powerwall battery is a 12-volt inverter. 12-volt inverters are made to run on a car’s alternator and battery voltage. This means that a 12-volt inverter will run anywhere between 10.5 and around 15 volts. A 3S NMC battery’s voltage will fall far below that range before the battery is out of energy.
This means that you will never be able to use your full battery capacity when powering a 12-volt inverter with a 3S NMC lithium-ion battery.
LFP Lithium Ion Powerwall
Building a LiFePO4 (LFP) powerwall is a little different. Sure, it's still lithium-ion cell chemistry, but LFP cells have a flatter voltage curve than NMC (18650) cells and they have a lower running voltage. This means that you have to put more LFP cells in series to achieve the same voltage as NMC 18650 lithium-ion cells. This actually turns out to be a great thing if you plan on building a 12-volt system.
LFP cells have a fully charged voltage of 3.65 volts and a dead voltage of about 2 volts. This means that if you put 4 LFP cells in series, you will have a fully charged voltage of 14.6 volts and a dead voltage of around 10 volts.
This much more closely matches the discharge curve of a 12-volt lead acid battery. 12-volt inverters and many other 12-volt devices are actually made to run at the voltage range of a vehicle. This means that you can run just about any device that was made to run in an automobile directly from a 4S LFP battery without using any kind of regulator.
How To Pick A BMS For A Powerwall
The BMS is the heart and brain of the battery. It decides if current flows in or out of the battery or not. If it's a smart BMS, it will also provide an interface for you to monitor your battery's individual cell group voltages. For a more detailed explanation on picking a battery management system, we wrote a guide to help you choose the right BMS for your project.
Almost all BMS are N-Channel devices. That means that they only operate on the negative side of the circuit. The positive from the battery pack connects directly to the positive of the load. The negative from the battery pack goes into the BMS and then out of the BMS into the load.
With this setup, the BMS is able to either block or allow the flow of current on the negative side. Because a circuit is, well, a circuit, all you have to do is block one side to turn it off. BMS boards are rated for a certain amount of current. Just like the other things in this article, it's best to add 20 percent to the actual amount of current you need to give your BMS some breathing room.
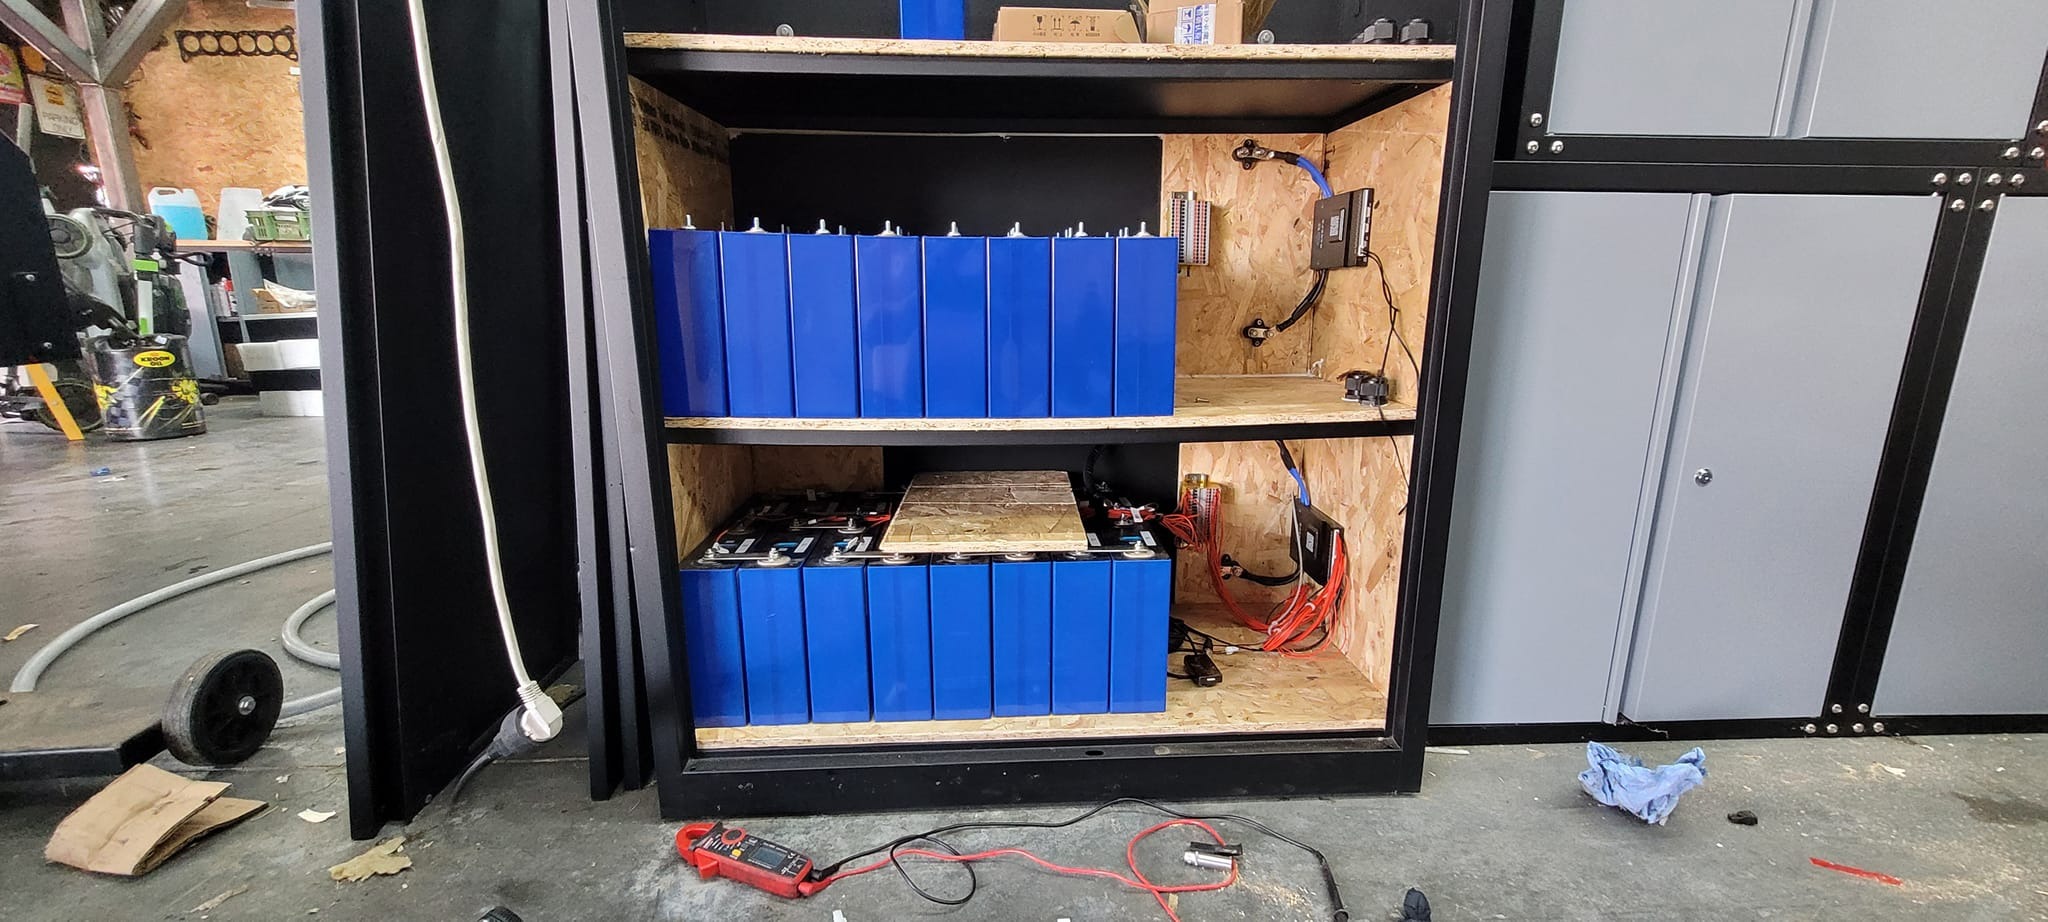
How To Build A DIY Powerwall
Below we will go through the steps required to build your powerwall. Steps that have A & B will be split by which cell chemistry and format you will be using. “A” will refer to cylindrical format cells and “B” will refer to LFP prismatic type cells.
Step 1: Estimate Load Current
Current is watts divided by volts. So if you are looking to build a 12-volt powerwall and you estimate that your load needs 1500 watts, then your load current will be 125 amps. That's a lot. The same load on a 24V system would need just 62.5 amps to power the same 1500-watt load. It's good to leave some overhead, so whatever your load current is, multiply that figure by 1.2. Whatever the result is, that is what you need to build your battery to.
Step 2A: Choose Voltage For 18650 Powerwall
Voltage dictates how much current will be required for a given amount of watts. This means that the higher voltage system you have, the lower the current it will need to support. A higher voltage reduces the stresses on every component in the system.
For this reason, running higher system voltages is almost always better. The only downside is sometimes higher voltage equipment can be more expensive. So, it's important to find a balance between your budget and your goals.
NMC chemistry really doesn’t allow for a proper 12-volt battery. This is because even though the full charge voltage of a 3S NMC battery is pretty close to 12 volts, its dead voltage will be around 7.5 to 7.8 volts, which is far too low to run almost all 12-volt devices. For this reason, if you want to build a 12-volt system, you pretty much have to go with an LFP powerwall.
Step 2B: Choose Voltage For LFP LifePO4 Powerwall
The above also applies to LFP (LifePO4) cells. The one key thing to remember is that if you are building a 12-volt system, it's basically a bad idea to use anything other than LFP. A 4S LFP battery has almost exactly the same voltage characteristics as a 12-volt lead acid battery.
This means that a 12-volt inverter will run longer and run more efficiently when powered by a 4S LFP battery compared to a 3S NMC battery. If you are not building a 12-volt system and are instead opting for a higher voltage, then it's better to use NMC cells.
Step 3A: Source 18650 Cells
You'll need to come up with some cells to build a powerwall with 18650s. There are all kinds of places to get these things. You don't even have to buy them. You can find them in old laptops, discarded ebike and scooter battery packs, and more. You also don't have to buy brand new 18650s. There are several thriving markets on the internet that sell used cells. Many of these markets do some level of testing and grading before selling salvaged 18650s.
This makes it so there are many places to get cheap or even free battery cells. If you want to build a brand new powerwall with 18650s, that's also not a problem because there are even online retailers that sell brand new 18650 lithium-ion cells.
Step 3B: Source LFP Cells
LFP cells are relatively new. This means it will be pretty hard to find them in any broken electronics or discarded battery packs. Another reason why you probably won't find any used LFP cells any time soon is the fact that LFP cells can commonly last for 5000 or more cycles. NMC 18650 cells, on the other hand, will only last for 500 to 1200 cycles, depending on how you treat them.
So, if you are wanting to build a powerwall with LFP cells, you will more than likely have to buy them brand new. LFP chemistry is less energy dense than NMC chemistry. So, the cells are larger so that they can store a similar amount of energy. LFP cells are most commonly found in the prismatic format. There are cylindrical LFP cells, and the most common size is 26650, but prismatic LFP cells are much more common and easier to work with compared to cylindrical-based cells.
LFP cells are great for their longevity and the fact that 4 of them in series can basically match the voltage curve of a 12-volt lead acid battery. If you try to charge an LFP battery in extremely cold conditions, however, it will destroy the battery. For this reason, any good LFP BMS will have a temperature sensor on it.
Step 4: Source Inverter
It won't be so easy to find a used inverter, so plan on buying that one new. There are online stores and marketplaces that are dedicated to these types of components, but their prices are often much higher than the alternative.
So, when it comes to inverters, the best place to get one is Amazon or online stores that specialize in powerwalls and their components. Sizing an inverter follows a similar process as the battery for your DIY powerwall. You want to find out what your load needs and then multiply that figure by 1.2. This is done to avoid maxing out your components. Leaving a 20% overhead means that you are never running your equipment at max. Here is an example of a 1000W load at 24V:
(1000 watts ÷ 24 volts) = 41.6 amps
41.6A x 1.2 = 50A
So if you have a 41.6 amp load, it's best to build your battery (BMS, cells, and connections) to be able to withstand 50 amps. It works the same way for sizing an inverter in watts:
1000 watts x 1.2 volts) = 1200 watts
So if you have a 1000W (1kw) load, it's best to pick an inverter that is good for at least 1200W (1.2kw).
Step 5A: Choose A Conductor For DIY 18650 Powerwall
Any time you're building a battery there is going to be a choice between copper and nickel. Copper is 5 times more conductive than nickel, so it's best to use copper with compact, high-current battery packs.
Due to the fact that powerwall batteries are large, stationary batteries that have their load current spread over many cells in parallel, there is almost no reason to use copper over nickel except for the main bus connections on your DIY powerwall battery.Step 5B: Choose A Conductor For DIY LFP Powerwall
While it is true that LFP cells are available in canister forms, most of the time LFP chemistry is found in prismatic cells. Unlike cylindrical cells, prismatic cells don't require a welder to be used.
This type of cell instead has convenient screw terminals that allow for the use of bus bars. Just like the conductor for welded batteries, bus bars come in a variety of material types and thicknesses. When it comes to building a DIY LFP powerwall, typically copper or aluminum bus bars are used.
Step 6A: Weld The Cells Together
Spot welding cells together is somewhat unsettling. This is because there is no simple way to verify the welds. This is why the best advice is to do a weld on a test cell and try to rip the weld off. If you either cannot rip the weld off by hand or when you do it tears apart and leaves bits of the conductor on the battery, then you know you've got a good weld.
The problem with this method is that you have to *hope* that your next welds on the actual cells you are going to use are just as good as the test weld.
So, after you verify that your welder is working to expectation, weld the cells together into one solid block. This is done by welding all the + connections of your parallel group cells together and welding all the - connections together as well.
After that, you can weld all of your P groups in series to form a battery pack. These 2 steps are usually combined into one by welding all of the + of one P group to all of the - of the next P group.
Step 6B: Bolt-On The Bus Bars
Connect all the positive connections of your parallel group cells together with a single bus bar. After that, do the same thing with the negative connections.
Then you can connect all your P groups in series with bus bars to form a battery pack. Just like welding a battery, when building a powerwall with bus bars, these 2 steps are usually combined into one by connecting all of the positives of one P group to all of the negatives of the next P group with a single bus bar.
Step 7: Add The BMS
The BMS is responsible for making sure the powerwall battery stays in a safe state both for the battery and for you.
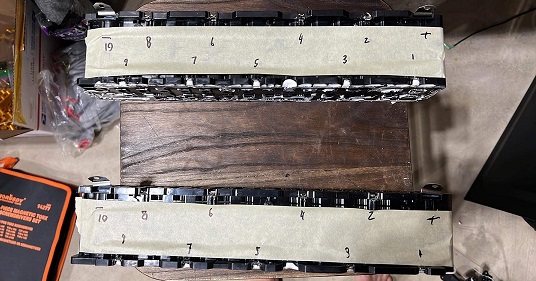
To be able to do that, the BMS has to know the exact voltage of each parallel group that is wired in series. Because of this, the BMS has many wires that need to be attached. The small, numerous wires are the sense leads they are also referred to as balance leads. They are connected to each junction between the cell groups and on the very ends of the battery. This process can be overwhelming at first so we wrote a more detailed guide on how to wire balance leads. The large wires are the in and out for the negative connection of the battery.
Because BMS boards are N-channel devices, you don't have to attach the positive line anywhere on the BMS. Instead, the positive goes straight from the battery pack to the connector or load. The negative from the battery pack goes into the B- connection and out of the P- connection.
Step 8: Attach An Inverter To Your DIY Powerwall
In a powerwall battery, the inverter is responsible for powering your entire load. So you are going to need properly sized wires connecting your battery to the inverter. The bigger the wires, the better, which we will touch on below.
The wire gets expensive really quickly, so basically, the goal is to buy the highest gauge wire you can afford and/or are willing to deal with. Larger wire is harder to work with, so that is definitely a factor. The reason why we are giving this advice is because the thicker the wires you have, the lower the resistance they will have.
This means that even under super heavy loads, your wires won't get warm at all. Remember, if your wires are ever getting warm, even just a little bit, that is evidence that the wire cannot handle the amount of power you are putting through it.
Even if everything works, even if it doesn't get super hot, any emitted heat means that the wire has become a load itself. Any warmth you feel in your wires is wasted energy and can potentially be a fire hazard. So, use the biggest wires you can.
Step 10: Attaching Powerwall Charger
Before you attach your DIY powerwall to your charger, you need to make sure your charger is properly configured. Most charge controllers these days have some form of an LCD screen and user-interface buttons.
So, go into your charge controller’s menu and verify that it's set for the correct cell chemistry. Most of the time a DIY powerwall will be lithium-ion, but the charge controllers will support several battery chemistries so it's important to make sure your charge controller is set to the right one before attaching it to your battery.
Another thing to check for is the current setting. By default, your charge controller may be set for a current level that is either above or below the ideal level for your battery. If the current level is set too low, the battery will take way too long to charge. In this situation, you can actually use more energy than can be put back into your battery, causing it to die.
If, on the other hand, you are charging your DIY powerwall with too much current, it could damage the battery cells or even pose a fire risk. For these reasons, it's very important to check those settings before attaching your charge controller to your DIY powerwall.
Picking An Inverter
If the BMS is the heart of the battery, then the inverter is the heart of the off-grid system. An inverter is what turns your DC battery voltage into a 120V AC voltage that can power common household devices and appliances.
You will need an inverter that can support the amount of watts your load will require or less. In fact, it's good to have at least a 20% margin so that you aren't maxing the inverter out.
The size of your inverter depends on many factors, but we can break them down into three categories.
Low Power Auxiliary Inverters
A low-power auxiliary inverter is something that you would plug a cell phone charger or other simple low-power devices into. These are the kind of inverters that plug right into a vehicle’s cigarette lighter socket. These inverters generally max out at about 200 watts.
This type of inverter is almost always a square wave inverter. Square wave inverters produce a signal that is the same level as a normal wall power signal but it's not quite the same shape. This is fine for most lower-power electronics.
This is not the type of inverter that you would want to use for a DIY powerwall, you are going to need a pure sine wave inverter.
There does exist a category of inverter between a low-power auxiliary inverter and a high-power pure sine wave inverter. That would be the high-power square wave inverter. The problem with those is that just about anything that needs a high amount of power will also need to run on a pure sine wave.
High Power Pure Sine Wave Inverters
If you are powering anything more than a few hundred watts, then you will need a high-power pure sine wave inverter. This type of inverter can power high-wattage devices like drills, washing machines, and air conditioners. Because they use a pure sine wave, the devices that it powers will see a clean power signal no different than what comes from the wall.
Full House Inverters
Full-house inverters take things up a few notches. This type of inverter would be directly patched into your home’s breaker box. This type of inverter is large and expensive, but they are pretty much the only way to take your entire house completely off of grid power.
How To Charge A DIY Powerwall
For some DIY powerwall BMS, there will be a separate port for charge and discharge. Other BMS will manage charge and discharge control through a common port. Either way, attaching a solar or wall charger to your DIY powerwall is the same procedure.
Charging is obviously a crucial component of any powerwall system. After all, if you can't charge your powerwall, you can only use it once. There are many different lithium-ion charging solutions on the market, and you can really go all out and build a totally custom system from off-the-shelf components and modules.
Usually, however, it's a lot easier to use an all-in-one charge controller for your powerwall. There are all kinds of charge controllers available ranging from various types of solar controllers to charge controllers that depend on AC power.
When it comes to solar charge controllers for a DIY powerwall, there are two main types. The first type is the PWM solar charge controller. PWM solar charge controllers regulate the amount of energy going into the battery by controlling how much time the solar panel is spent connected to the battery over the course of an extremely fast loop.
You don’t have to charge your DIY powerwall with solar energy. There are a wide array of wall-plug-based charge controllers, battery chargers, regulators, and converter boards that can be used to charge a DIY powerwall. If you are up to the task you can even build your own DIY battery charger.
There will be a + and - connection associated with the charger and all you have to do is connect those to the + and - charger connection on your BMS. Before connecting your DIY powerwall to your charger, however, there are some things that you need to know.
Conclusion
Building a DIY powerwall is a rewarding process that can teach you a lot while saving you a ton of cash. Building a DIY powerwall may seem overwhelming at first, but once you learn the various aspects, it will feel much more manageable.
When building a DIY powerwall, you need to calculate what voltage and current is best for your load. This is so you can know what to look for when picking your inverter and BMS. Once you have that sorted out, you just need to source the cells that you need for your DIY powerwall. Then, the cells need to be welded together in their proper configuration. The next step is to add the BMS and all of its sense wires. Once all that’s finished you just need to attach the charge and discharge connectors and wrap up the battery. Finally, you simply need to attach your battery to the inverter.
We hope this article helped you learn everything you needed to know about how to build a DIY powerwall. Thanks for reading!
Turn the guide into a real build plan
If this article is part of an actual battery, powerwall, or pack-design project, the next step is usually moving from theory into the calculators and planning tools.
When considering using LFP or NMC chemistry for a project the price per kilowatt is a big factor in what you choose. For most cases, space and size concerns may come into play which will dictate which you choose over price alone. However sometimes the main factor is price, we will go over what prices we are seeing in this article.
Picking the best-suited BMS for any battery build can be a little confusing. For larger-sized battery packs like those used in DIY powerwalls, this can get more complicated due to higher amperage requirements. We lay out in this article all the major considerations to help you pick the right BMS the first time.
In powerwalls it's common to have multiple battery packs running in series to meet your voltage requirements. Over time one or more packs may slip out of balance so learning how to get individual packs into balance is crucial. This is a pretty simple and straightforward task, read more about it here.